Java Serialization: An Introduction :
Understanding Serialization
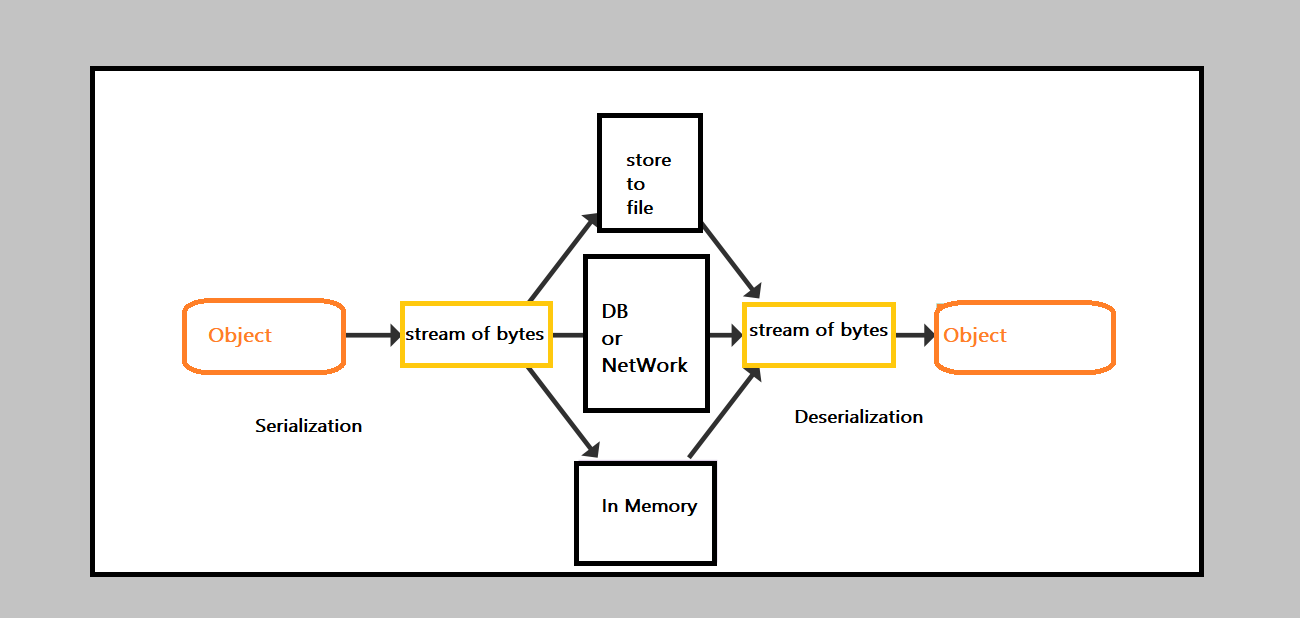
Java serialization is a mechanism that allows you to convert a Java object into a byte stream, which can be easily stored in a file, sent over a network, or otherwise transmitted between different parts of a program. This article will guide you through the fundamentals of Java serialization, step by step.
What is Serialization In Java ?
Serialization is the process of converting an object into a byte stream. This byte stream can then be saved or transmitted, and later, the object can be reconstructed from the byte stream. It’s a crucial feature in Java for persisting object state.
Why Use Serialization?
- Persistence: Save the state of an object for later use. This is useful for applications that need to store and retrieve data between program executions.
- Communication: Transmit objects between different parts of a program or between different applications over a network.
- Caching: Cache objects by saving their serialized form, reducing the need to recreate them from scratch.
The Serializable Interface In Java
For a class to be serializable, it must implement the Serializable interface. This is a marker interface, meaning it doesn’t have any methods. Its purpose is to indicate to the Java runtime that objects of the class can be serialized.
import java.io.Serializable;
public class MyClass implements Serializable {
// Class definition
}
Basic Serialization Example
Let’s consider a simple example. Assume we have a Person class:
import java.io.Serializable;

public class Person implements Serializable {
    private String name;
    private int age;

    public Person(String name, int age) {
        this.name = name;
        this.age = age;
    }

    @Override
    public String toString() {
        return "Person{name='" + name + "', age=" + age + '}';
    }
}
Here Person class is a Serializable class.
Now Lets understand , how to serialize an instance of the Person class and save it to a file. We’ll also discuss the role of ObjectOutputStream and delve into the serialization process in more detail.
Basic Serialization Process
In the previous article, we introduced the concept of Java serialization. Now, let’s explore the basic steps to serialize an object. We’ll use the Person class from the previous example.
Serialization Steps:
1.Implement Serializable:
Ensure that the class you want to serialize implements the Serializable interface.
import java.io.Serializable;

    public class Person implements Serializable {
        private String name;
        private int age;

        // Constructors, methods, and other fields...
    }
2.Create an Object:
Instantiate an object of the serializable class.
Person person = new Person(“John Doe”, 30);
3.Create ObjectOutputStream:
Use ObjectOutputStream to write the object to a file or any output stream.
import java.io.FileOutputStream;
    import java.io.ObjectOutputStream;
    import java.io.IOException;

    try (ObjectOutputStream outputStream = new ObjectOutputStream(new FileOutputStream("person.ser"))) {
        outputStream.writeObject(person);
        System.out.println("Person object serialized successfully.");
    } catch (IOException e) {
        e.printStackTrace();
    }
Here, we’re using a try-with-resources statement to automatically close the ObjectOutputStream. The writeObject method serializes the Person object and writes it to the specified file (“person.ser” in this case).
Understanding ObjectOutputStream
The ObjectOutputStream is responsible for writing primitive data types and objects to an output stream. It’s a crucial part of the serialization process. It provides methods such as writeObject(Object obj) to write objects.
Serialization in Action :
When you run this program, it will create a file named “person.ser” in your project directory. This file contains the serialized form of the Person object. The serialization process converts the object’s state, including the values of its fields, into a sequence of bytes.
In the next article, we’ll explore deserialization—how to read this serialized object back from the file and reconstruct the original Person object. Understanding both serialization and deserialization is key to effectively using Java’s serialization mechanism. Stay tuned..
Java Serialization: Basic Deserialization
Introduction to Deserialization
Deserialization is the process of reconstructing an object from its serialized form.
Deserialization Steps:
1.Implement Serializable
Ensure that the class you want to deserialize implements the Serializable interface.
import java.io.Serializable;

    public class Person implements Serializable {
        // Fields, constructors, methods...
    }
2.Create ObjectInputStream:
Use ObjectInputStream to read the object from the file or any input stream.
import java.io.FileInputStream;
    import java.io.ObjectInputStream;
    import java.io.IOException;

    try (ObjectInputStream inputStream = new ObjectInputStream(new FileInputStream("person.ser"))) {
        // Deserialization code will go here
    } catch (IOException e) {
        e.printStackTrace();
    }
Similar to ObjectOutputStream, we’re using a try-with-resources statement to automatically close the ObjectInputStream.
3.Read and Cast the Object:
Use the readObject method to read the object from the stream. Since this method returns an Object, you need to cast it to the appropriate type.
try (ObjectInputStream inputStream = new ObjectInputStream(new FileInputStream("person.ser"))) {
        Person deserializedPerson = (Person) inputStream.readObject();
        System.out.println("Person object deserialized: " + deserializedPerson);
    } catch (IOException | ClassNotFoundException e) {
        e.printStackTrace();
    }
The readObject method reads the byte stream from the file and reconstructs the original Person object. We cast it to the Person type since we know the object’s class.
Deserialization in Action
When you run the deserialization code, it reads the “person.ser” file and reconstructs the Person object. The toString method in the Person class is then called to display the deserialized object’s information.
Understanding ObjectInputStream
The ObjectInputStream is responsible for reading primitive data types and objects from an input stream. It complements ObjectOutputStream and provides methods like readObject for reading objects.
Java Serialization: Advanced Topics
Handling Versioning and Customization
Versioning with serialVersionUID
When a serializable class changes, it’s essential to manage versioning to ensure compatibility between different versions of the class during deserialization. This is where serialVersionUID comes into play.
Defining serialVersionUID:
Include a serialVersionUID field in your class to indicate the version. This helps in handling version mismatches during deserialization.
import java.io.Serializable;

    public class Person implements Serializable {
        private static final long serialVersionUID = 1L; // Version 1
        // Fields, constructors, methods...
    }
If you make changes to the class, increment the serialVersionUID. This informs the runtime that the class has been updated.
Handling Version Mismatches:
- When a serialized object is being deserialized, the runtime checks if the
serialVersionUIDof the loaded class matches theserialVersionUIDstored with the serialized object. - If they match, deserialization proceeds; otherwise, an
InvalidClassExceptionis thrown.
Customizing Serialization
You can customize the serialization process by implementing special methods in your class.
writeObject and readObject Methods:
Implement the writeObject and readObject methods to have more control over how your object is serialized and deserialized.
private void writeObject(ObjectOutputStream out) throws IOException {
        // Custom serialization code here
        out.defaultWriteObject(); // Default serialization
    }

    private void readObject(ObjectInputStream in) throws IOException, ClassNotFoundException {
        // Custom deserialization code here
        in.defaultReadObject(); // Default deserialization
    }
These methods are called automatically during serialization and deserialization.
Externalizable Interface:
For complete control, implement the Externalizable interface and override the writeExternal and readExternal methods.
import java.io.Externalizable;
    import java.io.ObjectInput;
    import java.io.ObjectOutput;

    public class Person implements Externalizable {
        // Fields, constructors...

        @Override
        public void writeExternal(ObjectOutput out) throws IOException {
            // Custom serialization code here
        }

        @Override
        public void readExternal(ObjectInput in) throws IOException, ClassNotFoundException {
            // Custom deserialization code here
        }
    }
Exception Handling during Serialization
Serialization can throw exceptions, such as IOException or ClassNotFoundException. It’s essential to handle these exceptions appropriately in your code.
try (ObjectOutputStream outputStream = new ObjectOutputStream(new FileOutputStream("person.ser"))) {
    outputStream.writeObject(person);
    System.out.println("Person object serialized successfully.");
} catch (IOException e) {
    e.printStackTrace();
}
Transients and Non-Serializable Fields
- Be aware that fields marked as
transientwon’t be serialized. If you have non-serializable fields within a serializable class, consider custom serialization methods.
Certainly! Let’s provide two separate examples for serialization and deserialization in Java.
Serialization Example:
In this example, we’ll create a simple Person class, serialize an instance of the class, and save it to a file.
import java.io.FileOutputStream;
import java.io.IOException;
import java.io.ObjectOutputStream;
import java.io.Serializable;

public class SerializationExample {
    public static void main(String[] args) {
        // Create a Person object
        Person person = new Person("John Doe", 25);

        // Serialization: Write the object to a file
        try (ObjectOutputStream outputStream = new ObjectOutputStream(new FileOutputStream("person.ser"))) {
            outputStream.writeObject(person);
            System.out.println("Person object serialized successfully.");
        } catch (IOException e) {
            e.printStackTrace();
        }
    }
}

// Serializable class
class Person implements Serializable {
    private static final long serialVersionUID = 1L;

    private String name;
    private int age;

    public Person(String name, int age) {
        this.name = name;
        this.age = age;
    }

    @Override
    public String toString() {
        return "Person{name='" + name + "', age=" + age + '}';
    }
}
In this example:
- We have a
Personclass that implements theSerializableinterface. - An instance of the
Personclass is created. - The
ObjectOutputStreamis used to serialize thePersonobject and write it to a file named “person.ser.”
Deserialization Example:
Now, let’s create an example for deserialization. We’ll read the serialized Person object from the file and reconstruct it.
import java.io.FileInputStream;
import java.io.IOException;
import java.io.ObjectInputStream;

public class DeserializationExample {
    public static void main(String[] args) {
        // Deserialization: Read the object from the file
        try (ObjectInputStream inputStream = new ObjectInputStream(new FileInputStream("person.ser"))) {
            // Reconstruct the Person object
            Object obj = inputStream.readObject();

            if (obj instanceof Person) {
                Person deserializedPerson = (Person) obj;
                System.out.println("Person object deserialized: " + deserializedPerson);
            }
        } catch (IOException | ClassNotFoundException e) {
            e.printStackTrace();
        }
    }
}
In this deserialization example:
- The
ObjectInputStreamis used to read the serializedPersonobject from the file “person.ser.” - The
readObjectmethod reconstructs thePersonobject from the byte stream. - We check if the deserialized object is an instance of
Personbefore printing it.
Run these examples sequentially, and you’ll observe the serialization and deserialization processes in action.
If the class used during deserialization is different from the class that was used during serialization, it will lead to a ClassCastException at runtime. This is because the object being deserialized is expected to be an instance of the original class used for serialization.
Let’s modify the deserialization example to demonstrate this scenario:
import java.io.FileInputStream;
import java.io.IOException;
import java.io.ObjectInputStream;

public class IncorrectDeserializationExample {
    public static void main(String[] args) {
        // Deserialization with a different class: Read the object from the file
        try (ObjectInputStream inputStream = new ObjectInputStream(new FileInputStream("person.ser"))) {
            // Attempt to reconstruct the object using a different class
            Object obj = inputStream.readObject();

            if (obj instanceof IncorrectPerson) {
                // This block won't be executed, as the object is not an instance of IncorrectPerson
                IncorrectPerson incorrectDeserializedPerson = (IncorrectPerson) obj;
                System.out.println("IncorrectPerson object deserialized: " + incorrectDeserializedPerson);
            }
        } catch (IOException | ClassNotFoundException | ClassCastException e) {
            e.printStackTrace();
        }
    }
}

// A different class used during deserialization
class IncorrectPerson {
    private String name;
    private int age;

    // Constructors, methods...
}
In this example:
- We’ve created a new class named
IncorrectPersonwith different fields. - During deserialization, we attempt to reconstruct the object using
IncorrectPersoninstead of the originalPersonclass.
When you run this program, you’ll encounter a ClassCastException because the actual class of the deserialized object is not compatible with the type you’re trying to cast it to (IncorrectPerson in this case). This emphasizes the importance of maintaining class compatibility during serialization and deserialization to ensure a successful reconstruction of objects.
FINALLY,
Java serialization is a powerful mechanism for persisting object state and transmitting objects between different parts of a program. Here’s a summary of the key points:
- Serialization is the process of converting an object into a byte stream, and deserialization is the process of reconstructing an object from its serialized form.
- The
Serializableinterface,ObjectOutputStream, andObjectInputStreamare key components of Java’s serialization mechanism. - Versioning is crucial for managing changes to serializable classes. Use
serialVersionUIDto control version compatibility. - Customize serialization with
writeObjectandreadObjectfor more control over the process. - Be mindful of security considerations, performance impacts, and cross-language compatibility.
By following best practices and understanding potential challenges, you can leverage Java serialization effectively in your applications. Explore alternatives when needed and consider the specific requirements of your use cases.
Thank you for joining us in this Java Serialization series! We hope you now have a solid understanding of the fundamentals and advanced aspects of Java serialization. If you have further questions or need clarification on any topic, feel free to explore additional resources or seek guidance from the Java community. Happy coding :
Thanks For Visiting Our Blog..
Leave a Reply