
Filters in Spring Security :
In Spring Security, filters are a fundamental concept that implements the Servlet Filter interface. They act as interceptors in the request processing pipeline, allowing you to perform security-related tasks on incoming HTTP requests and outgoing HTTP responses. Spring Security leverages a chain of filters, known as the security filter chain, to execute these tasks in a specific order.
Key Roles of Filters:
Authentication:
Filters can handle user authentication by verifying credentials (e.g., username and password) against an authentication provider. Examples include “UsernamePasswordAuthenticationFilter” and “CasAuthenticationFilter“.
Authorization:
Filters can enforce access control by determining whether a user has the necessary permissions to access a particular resource. Common filters for this purpose include “antMatchers” (for URL pattern-based authorization) and “hasRole” (for role-based authorization).
Session Management:
Filters can manage user sessions, such as creating, invalidating, or renewing sessions. Spring Security provides the “SessionManagementFilter” for this purpose.
Security Context:
Filters can populate the Spring Security “SecurityContext” with user information and other security details needed for authorization decisions.
Additional Security Measures:
Filters can be used to implement various security features, such as CSRF (Cross-Site Request Forgery) protection, logging security events, or integrating with external security services.
Example: Basic Authentication with UsernamePasswordAuthenticationFilter
Consider a scenario where you want to secure an endpoint (“/admin”) using basic authentication. Here’s a breakdown of how filters would be involved:
- Client Request: The client sends an HTTP request (e.g., GET) to “/admin”.
- Security Filter Chain: The request enters the Spring Security filter chain.
- UsernamePasswordAuthenticationFilter: This filter intercepts the request and checks for the presence of an Authorization header containing a base64–encoded username and password.
- Authentication: If credentials are found, the filter attempts to authenticate the user by delegating to the configured “AuthenticationManager“. The “AuthenticationManager” interacts with an “AuthenticationProvider” (e.g., “JdbcUserDetailsManager“) to verify the credentials against your data source (e.g., database).
- Authorization (if successful): Upon successful authentication, a successful “Authentication” object is created and stored in the “SecurityContext”. Subsequent filters in the chain can access this object to make authorization decisions.
- Resource Access (if authorized): If the user is authorized to access “/admin”, the request continues to the target resource or controller for processing.
- Unauthorized Response (if failed): If authentication or authorization fails, the filter chain might return an unauthorized response (e.g., HTTP 401 Unauthorized) with an appropriate challenge mechanism (e.g., prompting for credentials).
- Customization and Order: Spring Security provides a variety of built-in filters, and you can also create custom filters to address specific security requirements.
The order of filters in the chain is crucial, as filters depend on the results of previous filters in the chain. Spring Security manages the filter chain order automatically, but you can override it using annotations like “@Order” or “FilterRegistrationBean“. By understanding Filters in Spring Security, you gain control over various aspects of your application’s security, ensuring a robust and secure environment.
Now Lets Understand Example of Filter In Spring Boot :
OncePerRequestFilter
OncePerRequestFilter is Filter base class that aims to guarantee a single execution per requestdispatch, on any servlet container. It provides a doFilterInternalmethod with HttpServletRequest and HttpServletResponse arguments.
Package : org.springframework.web.filter.OncePerRequestFilter
Example of OncePerRequestFilter step by step :
Step 1: Create Spring boot Project with below dependencies :
		<dependency>
			<groupId>org.springframework.boot</groupId>
			<artifactId>spring-boot-starter-security</artifactId>
		</dependency>

		<dependency>
			<groupId>org.springframework.boot</groupId>
			<artifactId>spring-boot-starter-web</artifactId>
		</dependency>
Step 2 : Spring Boot Main Class will be like this :
package com.crtr4u;
import org.springframework.boot.SpringApplication;
import org.springframework.boot.autoconfigure.SpringBootApplication;

/**
 * @author Swapnil Vyawhare Patil : https://crtr4u.com
 *
 */
@SpringBootApplication
public class FilterDemo1Application {
	public static void main(String[] args) {
		SpringApplication.run(FilterDemo1Application.class, args);
	}
}
Step 3 : Write Controller Class As below :
package com.crtr4u;
import org.springframework.web.bind.annotation.RequestMapping;
import org.springframework.web.bind.annotation.RestController;
/**
 * @author Swapnil Vyawhare Patil : https://crtr4u.com
 *
 */
@RestController
public class MyController {
	@RequestMapping("/admin")
	public String admin() {
		return "Admin";
	}

	@RequestMapping("/user")
	public String user() {
		return "User";
	}

}
Step 4 : Write your filter class as below :
package com.crtr4u.filter;

import java.io.IOException;
import org.springframework.web.filter.OncePerRequestFilter;

import jakarta.servlet.FilterChain;
import jakarta.servlet.ServletException;
import jakarta.servlet.http.HttpServletRequest;
import jakarta.servlet.http.HttpServletResponse;
/**
 * @author Swapnil Vyawhare Patil : https://crtr4u.com
 *
 */
public class MyRequestLoggingFilter extends OncePerRequestFilter {
    @Override
    protected void doFilterInternal(HttpServletRequest request, HttpServletResponse response, FilterChain filterChain)
            throws ServletException, IOException {
        String method = request.getMethod();
        String uri = request.getRequestURI();
        String remoteAddr = request.getRemoteAddr();
        logger.info(String.format("Incoming Request of type : %s %s from %s", "method : "+method, " Request URI: "+uri," and Remote Address :"+remoteAddr));
        filterChain.doFilter(request, response);
    }
}
Step 5 : Write ApplicationSecurityConfig class as below :
package com.crtr4u.config;
import org.springframework.context.annotation.Bean;
import org.springframework.context.annotation.Configuration;
import org.springframework.security.config.Customizer;
import org.springframework.security.config.annotation.web.builders.HttpSecurity;
import org.springframework.security.core.userdetails.User;
import org.springframework.security.core.userdetails.UserDetails;
import org.springframework.security.core.userdetails.UserDetailsService;
import org.springframework.security.crypto.bcrypt.BCryptPasswordEncoder;
import org.springframework.security.crypto.password.PasswordEncoder;
import org.springframework.security.provisioning.InMemoryUserDetailsManager;
import org.springframework.security.web.SecurityFilterChain;
import org.springframework.security.web.authentication.www.BasicAuthenticationFilter;
import com.crtr4u.filter.MyRequestLoggingFilter;

/**
 * @author Swapnil Vyawhare Patil : https://crtr4u.com
 *
 */

@Configuration
public class ApplicationSecurityConfig {
	@Bean
	SecurityFilterChain defaultSecurityFilterChain(HttpSecurity http) throws Exception {
		http.addFilterBefore(new MyRequestLoggingFilter(),BasicAuthenticationFilter.class);
		http.authorizeHttpRequests((requests) ->
		requests.requestMatchers("/admin").authenticated().anyRequest().permitAll());
		http.formLogin(Customizer.withDefaults());
		http.httpBasic(Customizer.withDefaults());
		return http.build();
	}

	@Bean
	public UserDetailsService userDetailsService() {
	    UserDetails user1 = User.withUsername("user")
	            .password(passwordEncoder().encode("user"))
	            .roles("USER")
	            .build();

	    UserDetails user2 = User.withUsername("admin")
	            .password(passwordEncoder().encode("admin"))
	            .roles("ADMIN")
	            .build();
	    return new InMemoryUserDetailsManager(user1, user2);
	}

	@Bean
	public PasswordEncoder passwordEncoder() {
	    return new BCryptPasswordEncoder();
	}
}
Explanation :
ApplicationSecurityConfig Class enables basic authentication with form-based login or HTTP Basic authentication for different user types (“user” and “admin”) and protects the “/admin” endpoint by requiring authentication.:
- This class is annotated with “@Configuration“, marking it as a Spring configuration bean.
1.SecurityFilterChain Bean:
The “defaultSecurityFilterChain” bean defines the security configuration using “HttpSecurity”.
This method configures:
– Request Logging: It adds a custom “MyRequestLoggingFilter” before the default “BasicAuthenticationFilter”.
This filter likely logs details about incoming requests.
- Authorization: It defines authorization rules using "authorizeHttpRequests".
    - Requests to "/admin" require authentication.
    - Any other request is permitted.
- Authentication: It enables both form-based login ("http.formLogin") and basic authentication ("http.httpBasic") with default configurations (using "Customizer.withDefaults()").
2.UserDetailsService Bean:
-The “userDetailsService” bean defines a service for loading user details:
– It creates two in-memory users (“user” and “admin”) with roles (“USER” and “ADMIN”) using “User.withUsername”.
– It uses the “passwordEncoder” to securely encode passwords before storing them.
– Finally, it returns an “InMemoryUserDetailsManager” with these pre-defined users.
(For production, consider using a database or other persistent storage for user credentials.)
3.PasswordEncoder Bean:
-The “passwordEncoder” bean defines a “BCryptPasswordEncoder” for secure password storage. This is a strong password hashing algorithm recommended for production use.
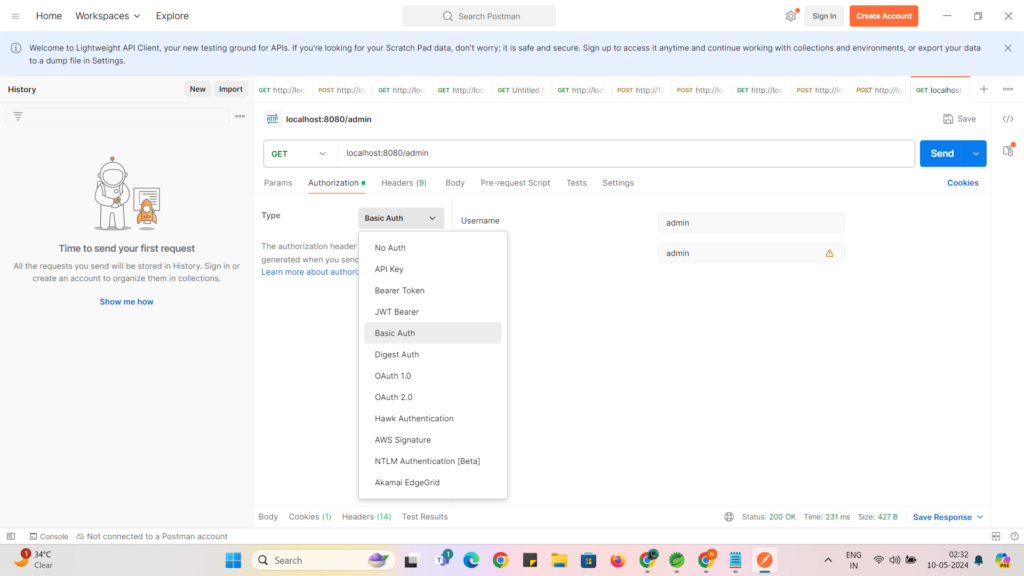
Now Once you run the application ,by default it will start on localhost 8080 port , Now Open PostMan Tool :
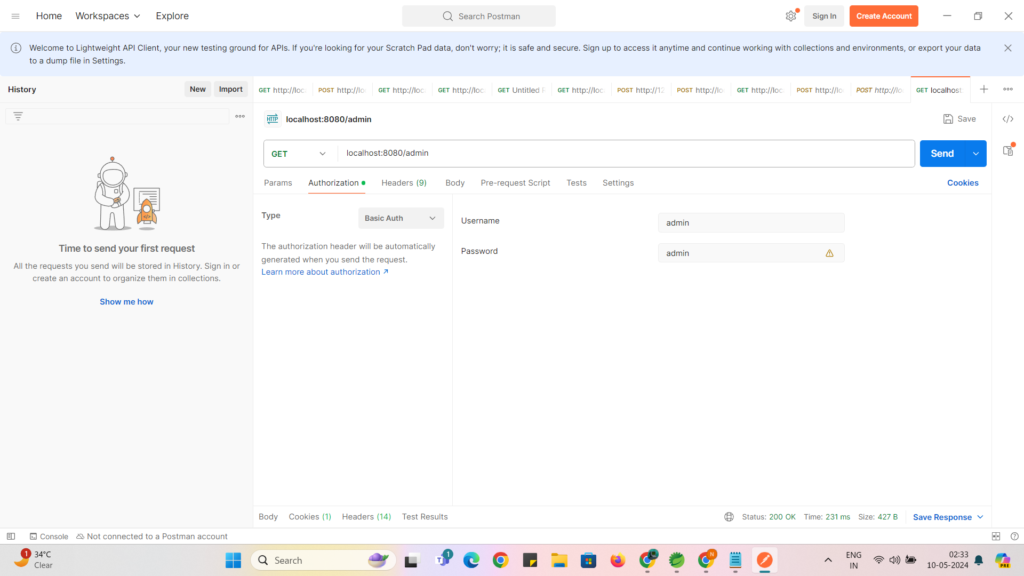
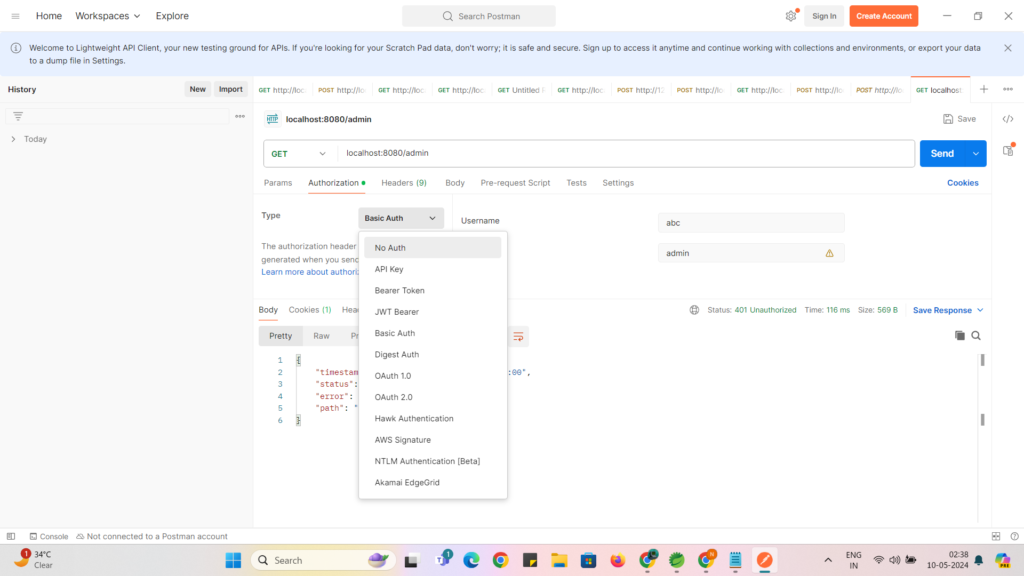
Inside Postman , choose Basic Authentication as below :
Then enter your User name and password :
Now Try to access “/admin” endpoint by clicking on Send Button :
localhost:8080/admin
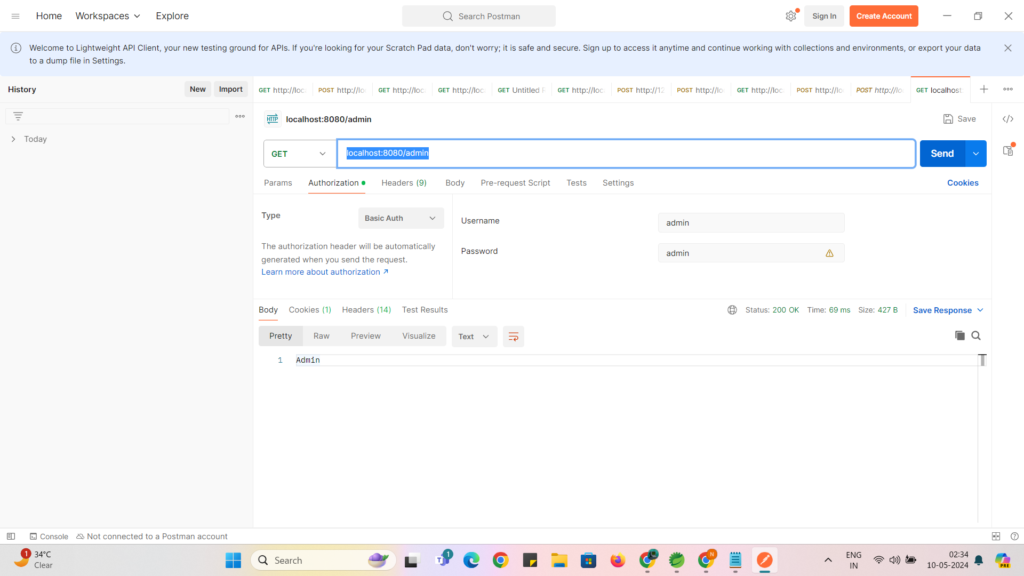
you can see response is success with Status : 200 Ok and Text in response as “Admin” from our controller.
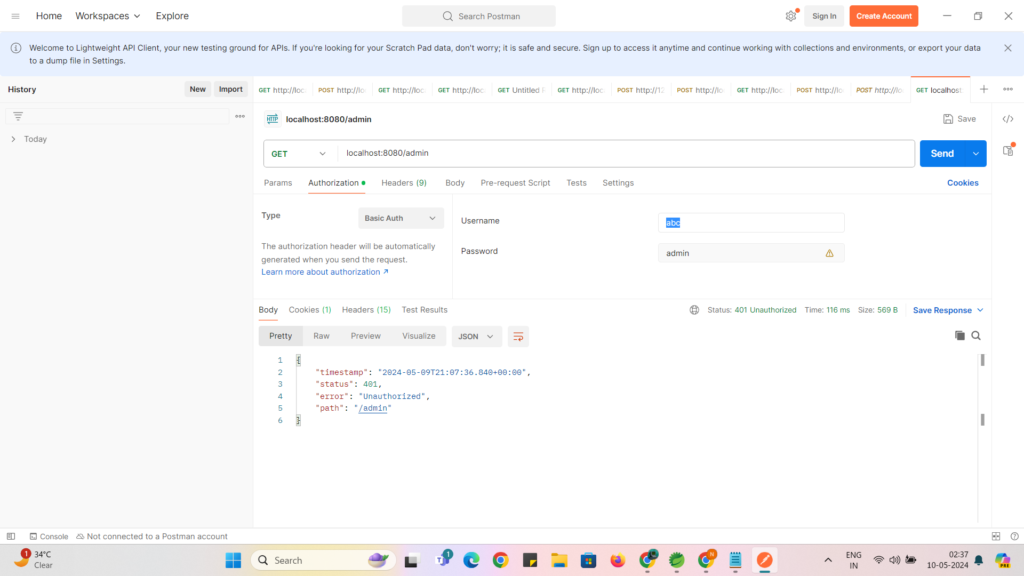
I hope you remember we configured 2 users in class ApplicationSecurityConfig :
now just try to send wrong username as abc , you can see error as below :
Now remove basic Auth and select No Auth as below :
Now If you click on Send Button as below then you will get error as below :
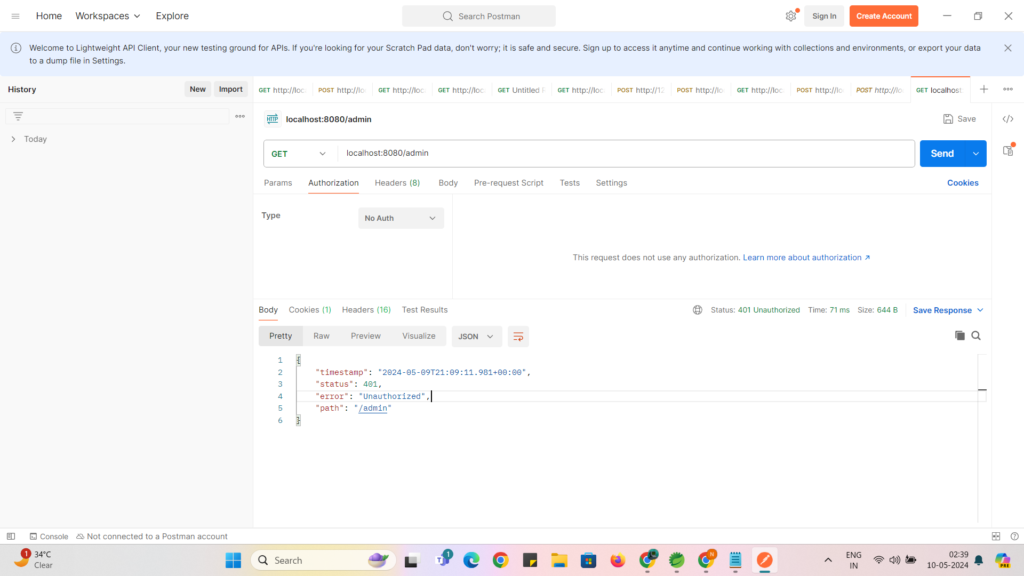
we got above error because in our ApplicationSecurityConfig , we applied authentication on endpoint “/admin” , so we need to select Basic Auth and enter usename and password
Now lets try to access “/user” enpoint with No Auth as below :
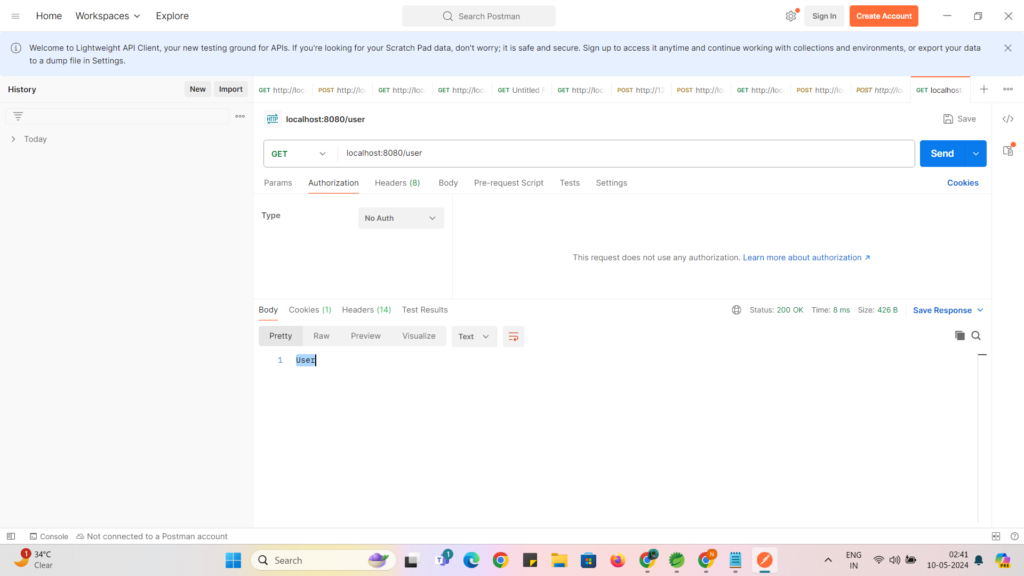
Here we got response because , other endpoints are not authenticated only “/admin” endpoint is authenticated.
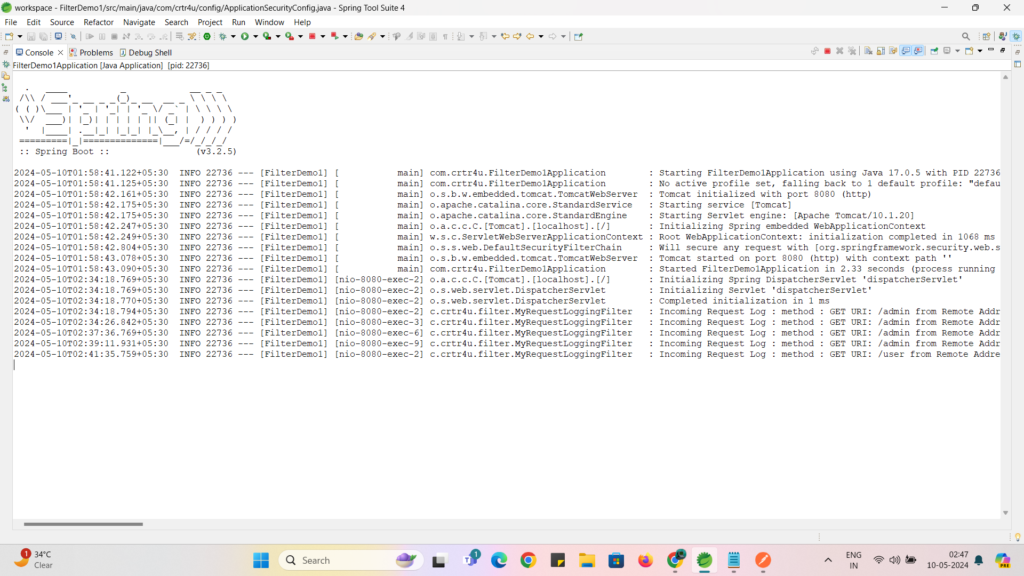
Now , our main purpose in this article was to Implement filter : for every request which you are sending from POSTMAN tool , our filter is printing log on console as below : you can check this filter logic again in MyRequestLoggingFilter class which is given at the beginning of our article.
2024-05-10T02:34:18.794+05:30  INFO 22736 --- [FilterDemo1] [nio-8080-exec-2] c.crtr4u.filter.MyRequestLoggingFilter   : Incoming Request Log : method : GET URI: /admin from Remote Address :0:0:0:0:0:0:0:1
2024-05-10T02:34:26.842+05:30  INFO 22736 --- [FilterDemo1] [nio-8080-exec-3] c.crtr4u.filter.MyRequestLoggingFilter   : Incoming Request Log : method : GET URI: /admin from Remote Address :0:0:0:0:0:0:0:1
2024-05-10T02:37:36.769+05:30  INFO 22736 --- [FilterDemo1] [nio-8080-exec-6] c.crtr4u.filter.MyRequestLoggingFilter   : Incoming Request Log : method : GET URI: /admin from Remote Address :0:0:0:0:0:0:0:1
2024-05-10T02:39:11.931+05:30  INFO 22736 --- [FilterDemo1] [nio-8080-exec-9] c.crtr4u.filter.MyRequestLoggingFilter   : Incoming Request Log : method : GET URI: /admin from Remote Address :0:0:0:0:0:0:0:1
2024-05-10T02:41:35.759+05:30  INFO 22736 --- [FilterDemo1] [nio-8080-exec-2] c.crtr4u.filter.MyRequestLoggingFilter   : Incoming Request Log : method : GET URI: /user from Remote Address :0:0:0:0:0:0:0:1
Thanks For Reading and Your Support,
Keep Reading
Leave a Reply